Using Bower and Gulp With Visual Studio 2015
Derrik Engel UI Designer#Code

We look at how to implement Bower and Gulp to bring package management and automation capabilities to Visual Studio 2015.
At Diagram, our team uses a variety of tools to manage complex projects involving multiple developers. With tools to handle version control and deployment, package management, and task automation, we are able to streamline our workflow and ensure that everyone is able to stay on top of ongoing code changes.
Much of our development efforts are done in Visual Studio 2015, which introduced native support for some great tools that handle front-end package management and task automation. NPM (Node.js Package Manager) and Gulp are part of the ASP.NET 5 Web Application template, but they can also be set up manually for use in older ASP.NET projects.
In order to make things a bit easier for developers, we wanted to take a look at how to get started using Bower (for package management) and Gulp (for automation) in Visual Studio 2015:
Getting Started
First, you’ll want to create a NPM configuration file in the root of the Visual Studio project to install modules like Bower and Gulp. This file can be created through Visual Studio by navigating to Add/New Item and searching for NPM, or by manually creating a package.json file containing the following code:
{
    "version": "1.0.0",
	"name": "my-project",
	"private": true,
    "devDependencies": {
        "bower": "1.7.9",
        "gulp": "3.9.1"
    }
}
For now, we will just install Bower and Gulp, but later our Gulp plugins will be added to this file as well.
Bower
Similar to NPM, Bower is a package manager, but specifically for front-end dependencies like JavaScript and CSS. Bower allows us to easily install and restore packages and keep them up to date, so developers don’t need to search the web for the latest version of what they are working on.
In order to begin using Bower, you’ll need to create a Bower Configuration File. Again, this can be done through Visual Studio or by manually creating a bower.json file in the root of your project. Before defining any dependencies for your project, you'll notice a .bowerrc file that was created alongside the bower.json file. In this file, you can specify the local directory where Bower will save packages. As an example, here is a bower.json file that will install jQuery:
{
    "name": "my-project",
	"private": true,
	"dependencies": {
		"jquery": "2.2.3"
	}
}
After saving the Bower configuration file, you will see your packages added to the directory specified in the .bowerrc file.
Gulp
Gulp is a JavaScript task runner that can be used to automate front-end tasks such as:
- Sass/LESS compilation
- Bundling and minification of files
- Removing old files from directories
- Copying files to output directories
- Generating documentation
- Generating source maps
- And much more!
Let’s look at an example of using Gulp to perform some of these tasks. First, we’ll want to use NPM to install “gulp-sass” for Sass compilation, “gulp-cssmin” for CSS minification, “gulp-concat” for bundling files, and “gulp-rename” for renaming minified files:
{
    "version": "1.0.0",
	"name": "my-project",
	"private": true,
    "devDependencies": {
        "bower": "1.7.9",
        "gulp": "3.9.1",
        "gulp-sass": "2.3.1",
        "gulp-concat": "2.6.0",
        "gulp-cssmin": "0.1.7",
        "gulp-rename": "1.2.2"
    }
}
Next, you'll need to create a Gulp configuration file through Visual Studio or by manually creating a gulpfile.js in your project. Now we can start defining tasks in Gulp:
/// <binding ProjectOpened="watch" />
"use strict";

var gulp = require("gulp"),
    sass = require("gulp-sass"),
	concat = require("gulp-concat"),
	cssmin = require("gulp-cssmin"),
	rename = require("gulp-rename");

var paths = {
	sass: "scss/",
	outputDirectory: "content/"
};

gulp.task("sass:compile", function () {
	return gulp.src(paths.sass + "main.scss")
        .pipe(sass())
        .pipe(gulp.dest(paths.sass));
});

gulp.task("bundle:css", ["sass:compile"], function () {
	return gulp.src(paths.sass + "main.css")
		.pipe(concat("styles.css"))
		.pipe(gulp.dest(paths.outputDirectory))
		.pipe(rename({ suffix: ".min" }))
		.pipe(cssmin())
		.pipe(gulp.dest(paths.outputDirectory));
});

gulp.task("watch", function () {
	gulp.watch(paths.sass + "**/*.scss", ["bundle:css"]);
});
Task Runner Explorer
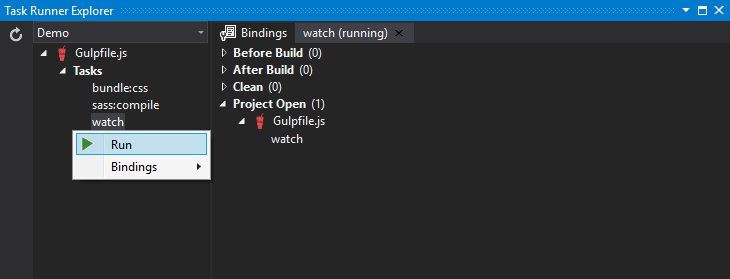
Tasks that are set up in Gulp can be automated based on Visual Studio bindings, or they can be run manually. You can see the tasks in Visual Studio using Task Runner Explorer, which provides a visual representation of your tasks and lets you examine and set their bindings:

Bindings can be run before or after Visual Studio builds a project, when the project is cleaned, or when the project is opened. For example, we can set a “watch” task to check if we’ve made any changes to Sass, and when changes are made, the task will automatically compile, bundle, and minify our changes.
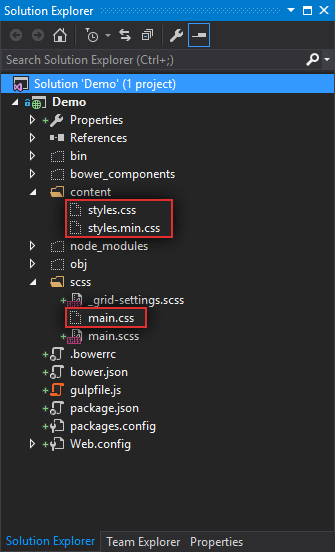
If we start the "watch" task and make changes to our Sass, we'll see that the new files have been generated:

Bower and Gulp are incredibly useful tools that make front-end development in Visual Studio much more streamlined. We hope that this guide has helped you get started using them, but if you have any questions or tips of your own, please feel free to leave a comment below. Thanks for reading!
Related Posts

Umbraco 7 Upgrade Costs and Considerations
Topics to consider when budgeting for an Umbraco 7 upgrade, including business needs, website redesign, integrations, and e-commerce needs.
Integrating Qualitative Data into Business Strategies
Discover how collecting, analyzing, and integrating qualitative data into your business strategy can enhance marketing insights and drive growth.
Results Matter.
We design creative digital solutions that grow your business, strengthen your brand and engage your audience. Our team blends creativity with insights, analytics and technology to deliver beauty, function, accessibility and most of all, ROI. Do you have a project you want to discuss?
Like what you read?
Subscribe to our blog "Diagram Views" for the latest trends in web design, inbound marketing and mobile strategy.
